

How to Tighten Steering Gear on a 1999 Toyota Camry UPDATED
How to Tighten Steering Gear on a 1999 Toyota Camry
Hardlymoving writes about do-it-yourself automobile maintenance on various makes and models.
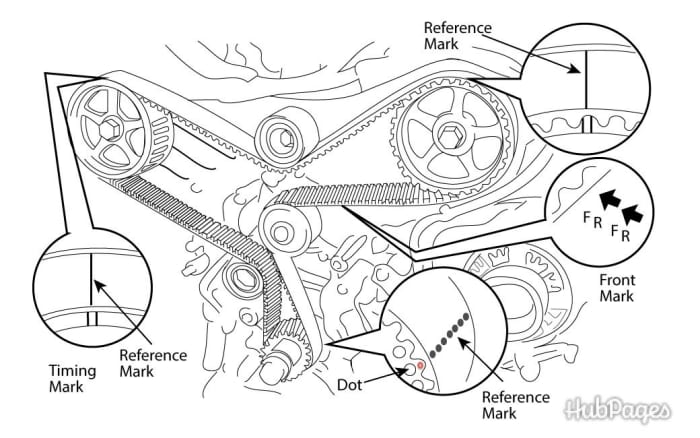
1MZFE timing belt, with marks at the crankshaft and camshafts.
The Toyota MZFE engine is a transversely-mounted, timing-belt driven, 24-valve, dual overhead cam (DOHC) aluminum V6 design. It is used in many Toyota and Lexus cars from 1994 to 2003, including the Lexus ES300 and RX300, and the Toyota Camry, Avalon, and Solara. It comes in a 3.0 liter version, the 1MZFE, and a three.3 liter version, the 3MZFE. Most engine components in the 1MZFE are interchangeable with the 3MZFE, including the timing belt, tensioner pulley, and guide caster, although the 3MZFE has a different tensioner configuration.
Encounter my other article for replacement of a timing chugalug on the 4-cylinder Camry (the 5SFE engine).
If you noticed oil leakage from the firewall side valve cover gasket, I have another article on how to replace the gasket on this engine in an Lexus ES300 which uses the same engine.
Replacing Broken Belts
In models before the 1999-2003 introduction of VVTI (Variable Valve Timing) technology, the engine'southward valve railroad train is "non-interference," meaning that if the timing belt breaks while the vehicle is operating, it volition not necessarily damage the valves or pistons. Therefore, you lot can use the instructions beneath to supervene upon a broken timing belt on a not-VVTI engine. Positioning the camshaft sprockets and the crankshaft caster alignment marks to Elevation Expressionless Centre (TDC) is all you need to do earlier installing the new chugalug. Later installing the belt, you can do a compression leakage exam to make sure the valves are still okay.
Toyota recommends belt replacement after xc,000 miles.
Other parts are often replaced at the same time. Some shops always replace the water pump with the chugalug, but in my feel the Aisin h2o pumps that come with the MZFE Camry are adept for at least 200,000 miles. At 150,000 miles, some guide pulleys (idler pulleys) and tensioner pulleys look worn and need replacement. The tensioner (actuator) doesn't generally need replacing. After 200,000 miles, I would definitely replace the seals (camshaft, crankshaft, and oil pump) and the h2o pump also, along with the timing chugalug. Whether or not y'all need to replace the seals depends on their mileage, age, and their observed status after yous remove the timing belt cover. On the four-cylinder 5SFE Camry these seals do starting time to leak at nigh 150K, but on the V6 MZFE they last longer. Using a "high mileage" oil may swell the seals and stop leakage for a while, though eventually (certainly after ten years) seals turn brittle and this trick won't piece of work.
Fourth dimension Needed
Allow iii or more than hours to replace the belt alone.
Reminder: marking the onetime belt with pigment where it meets the crankshaft and camshaft pulleys, and transfering these marks to the new belt, will get in much easier to install the chugalug if any of the pulleys happen to motility between the removal of the sometime belt and the installation of the new ane.
1MZFE Timing Chugalug Components

1MZFE Timing Belt component diagram
1MZFE side engine mount
- Touch driver (electrical, compressed air, or mechanical)
- High mass touch socket like this 1 (if encountering difficultly removing the crankshaft pulley bolt with a powered affect commuter).
- ane/2" breaker bar (if no impact driver bachelor)
- 1/2" & iii/8" drive socket wrenches
- Metric box wrenches and sockets
- one/two" & 3/viii" wrench extensions
- Screw drivers
- Pulley removal tool like this one (if encountering difficultly removing the crankshaft caster).
- Toyota camshaft seal installation tool similar this one (if replacing seals)
- Camshaft or crankshaft seal removal tool similar this one (if replacing seals)
- Long chain strap wrench tool like this one (if removing the camshaft sprocket to replace the camshaft seal)
- Jack (hydraulic or scissor)
- Standard jack stands
Japanese cars employ the following metric sizes: 10mm, 12mm, 14mm, 17mm, 19mm, 21mm, 22mm.
At a minimum, to remove and torque screws and bolts, especially the crankshaft bolt discussed below, yous will want a breaker bar. This is a tool of many uses.
Read More from AxleAddict
The side by side step up is an impact driver. Y'all can become a manual bear on driver, merely an electric impact driver is fifty-fifty better, if you lot tin afford it. The i below is the best I have used.
Parts Needed
- Replacement timing belt
- Chugalug tensioner idler caster (optional)
- Chugalug guide idler caster (optional)
- Timing chugalug cover gasket (optional)
- Side motor mount (engine control rod, "dog os") (optional)
- Water pump with gasket (optional)
- Ability steering fluid (optional)
- Crankshaft and camshaft seals if leaking oil
Common Timing Belt Kit Components (1MZFE)

Clockwise from upper right: timing chugalug tensioner or actuator, timing belt, water pump, water pump gasket, timing chugalug tensioner caster (lower left), idler pulley or guide pulley (center)
The cost of the chugalug and components tin can vary greatly. If you want to use Japanese OEM (Original Equipment Manufacturer) parts--the parts that Toyota puts its ain label on--you lot will desire a Mitsuboshi timing belt, Koyo pulleys, and an Aisin h2o pump. Other Japanese OEM brands include Denso, NGK, KYB, Akebono, GMB, and Sumoto. Shop and compare prices, including shipping costs, for the all-time deals.
But y'all can detect good parts from other manufacturers as well. As Japanese cars shift their manufacturing to the US, OEM manufactureres take come up to include American companies like Gates and Dayco.
Basically, any Fortune 1000 parts visitor should provide adequate parts.
1MZFE Timing Belt Kit
3MZFE Timing Belt Kit westward/Cam and Crank Seals
Video: Timing Chugalug & H2o Pump Replacement on the Lexus ES300 (1MZFE)
This video, the outset phase of my "redo" or makeover project on a Lexus ES300 (third Generation), will show you, step-by-footstep, how to replace the timing belt, water pump, idler caster, tensioner pulley, cam and crank seals. On this car, which has over 160K miles, the timing belt has slipped, the water pump and pulleys accept seized, and many parts are either worn out or in need of replacement. The steps in this video will work on other cars with the V6 1MZFE engine, such as the Camry V6, Solara V6, Highlander V6, Sienna, Avalon, and Lexus RX300.
The 1MZFE engine, of course, is a non-VVTI engine, so a cleaved timing belt can be replaced with a new chugalug without any business that the broken belt has bent the valves.
The video contains the procedures described in the text below, though it has some of the steps in a different order. The video gives more than detail than is in the text about replacing the h2o pump, crankshaft seal, and cam seals.
Video: Timing Belt & H2o Pump Replacement on the Toyota Sienna (3MZFE)
This timing chugalug replacement video is basically the same as the ES300 1MZFE engine only for the Sienna's 3.3L 3MZFE engine. The major difference is the redesign of the belt tensioner caster bracket.
Video: Timing Belt & H2o Pump Replacement on the Toyota Camry (3MZFE)
This timing chugalug replacement video is for a Camry with the 3MZFE engine. Over again, the major deviation is the redesign of the belt tensioner caster subclass.
Step by Step: Replacing the Timing Belt and Other Parts
The instructions and pictures beneath testify how to:
- Remove the accessory belts and crankshaft pulley
- Drain the power steering fluid (optional)
- Remove the timing belt cover and side engine mount
- Supersede h2o pump and pulleys (optional)
- Install the new timing belt
- Put everything dorsum together
Removing the Crankshaft Pulley and Accompaniment Belts
Letters refer to photos at the end of this section. Click on a photograph to enlarge information technology.
- Identify transmission in "park," use the parking brake, and chock the rear wheels.
- Support the vehicle on a jack stand and remove the passenger-side front end wheel.
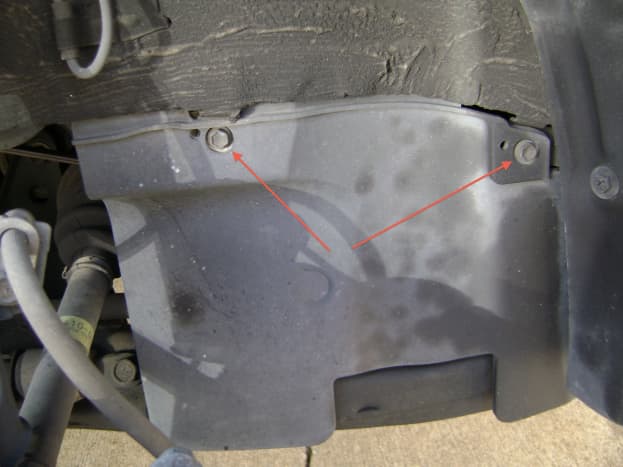
- Unbolt the forepart fender apron seal on the passenger side (A).
- Loosen the crankshaft pulley bolt (B). If you don't have an impact driver, apply a breaker bar (C) secured to the ground or frame of the car (D). "Thump" the ignition (run it briefly) for around 1 second. The torque from the starter motor should save the tension on the commodities. If that desn't work, it's possible your car's battery is also weak to provide plenty amps to loosen the commodities; you can attempt jumping the battery with another car's bombardment. If that doesn't work, applying heat to the bolt from a propane torch can aid ... but be careful ... too much heat will harm the oil seal. Equally a final resort, find a friendly garage possessor who'll torque the bolt off for you with their 180-lb air-powered impact driver.
- Turn the engine clockwise (East) to align the crankshaft pulley to the Peak-Dead-Eye (TDC) mark on the timing belt cover (F). (Encounter video at about 3:45.) Use a ane/two" drive socket wrench attached to the (loosened) caster bolt to ease engine rotation. Use an impact driver, or practice a quick twist of the socket wrench counter-clockwise, to spin off the crankshaft caster without upsetting the alignment.
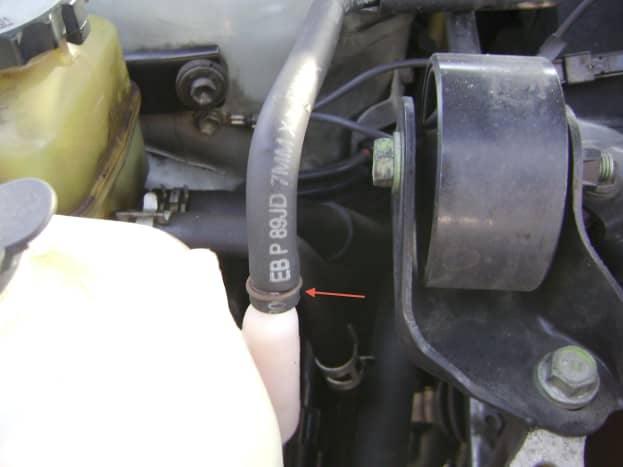
- (Optional:) If your ability steering fluid has turned black, information technology'due south convenient to replace it as role of this job; y'all can drain it from the power steering pump hose, instead of from the reservoir. Remove the hose clamp and hose from the metal tube located below the crankshaft pulley (Thousand). You lot can "push button" out most of the fluid by turning the steering wheel left and right while the fluid is draining out. When completely tuckered, reconnect the hose and clench (H).
- Relieve tension on the alternator pivot bolt (I).
- Loosen the tension on the alternator adjustment locking bolt (J).
- Turn the alternator belt adjustment bolt counter-clockwise until the alternator belt can be removed by pushing down on the alternator.
- Loosen or remove the ability steering pump subclass bolt (K,Fifty).
- With either a long metallic bar or crowbar, employ pressure level to the left side of the pump to relieve tension on the ability steering belt (M). Alternatively, a few light taps with a hammer on the power steering pump bracket volition move the pump forwards of the bolt and relieve tension on the belt.
- Remove both the alternator and power steering pump belts.
- Remove the crankshaft pulley bolt (Northward) and remove the pulley (encounter video at iv:40.) If the pulley does not slide out with a elementary tug, a pulley removal tool may be required (O).
Removing the Crankshaft Pulley and Accessory Belts: Photos A-O
Removing the Side Engine Mount and Timing Chugalug Cover
Letters refer to photos at the end of this section. Click on a photograph to enlarge it.
- Disconnect the coolant reservoir hose from the reservoir container (P).
- Disconnect the ii engine ground wire connectors (Q).
- Unbolt and remove the side engine mount (R, S).
- Remove the alternator bracket nut and bracket (T).
- Optional: to give yourself more room to work, you can detach the power steering hose and move information technology to the firewall (U, V).
- Unbolt and remove the lower timing belt comprehend, the upper timing chugalug cover, and the side engine mountain bracket. Keep the one long bolt in identify while removing the bracket (West).
- Remove the timing belt guide (Ten, Y, Z, AA, BB).
Removing the Side Engine Mountain and Timing Belt Cover: Photos P-BB
Removing the Timing Chugalug
Letters refer to photos at the finish of this section. Click on a photo to enlarge information technology.
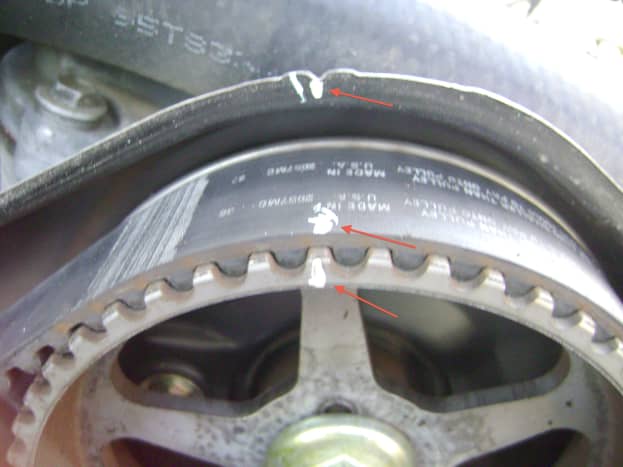
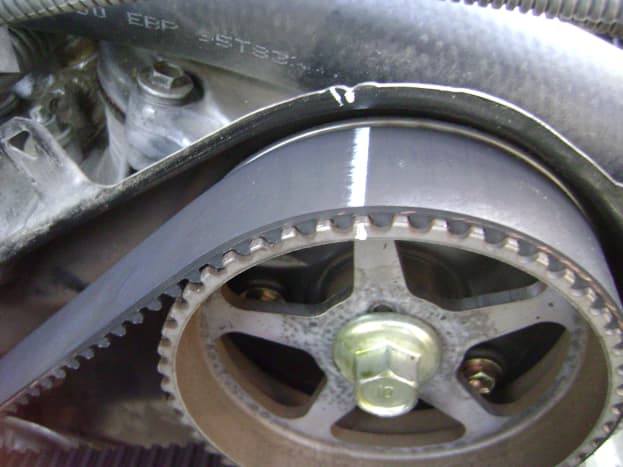
- Check that the camshaft alignment marks lucifer the backing plate alignment marks. If not aligned, spiral the crankshaft bolt dorsum in and rotate the engine with a wrench until alignment is made (CC).
- After the engine is aligned, apply paint marks to the camshafts and crankshaft, to their bankroll plates, and to the timing belt. These marks volition help with re-alignment if the crankshaft or camshafts happen to move during belt installation (DD).
- Unbolt the timing belt tensioner (EE). *Notation: For the 3MZFE engine (i.e. the 3.3 liter V6), the belt tensioner has been redesigned and the lower right motor mount has been added by Toyota blocking removal of the tensioner. To remove the 3MZFE belt tensioner, the correct lower engine mount must start be removed followed past the engine mount subclass. To do this: 1. Remove the front end motor mountain commodities. 2. Remove the lower right motor mount upper and lower nuts. iii. Place a hydraulic jack with wood block under the engine oil pan and slowly tilt the engine up until there is enough clearance to removed the right motor mountain. 4. After the mount has been removed, unbolt the mount bracket which volition let admission to the chugalug tensioner bolts for removal.
- Twist the timing belt about 45 degrees, simultaneously, in two places: between the correct camshaft and the crankshaft, and betwixt and the right camshaft and left camshaft. This volition slightly move both camshafts clockwise, which makes it easier to remove the sometime chugalug, as well every bit easier to install the new belt. A small amount of slack will now be between both camshafts and betwixt the right camshaft and the crankshaft.
- Remove the sometime timing chugalug (FF).
- Transfer the paint marks from the one-time belt to the new belt: set the former belt downwardly, place the new belt over the erstwhile belt with their cogs aligned, and wherever you encounter a mark on the quondam chugalug, place a matching mark on the new ane.
Removing the Timing Belt: Photos CC-FF
Optional: Replacing the H2o Pump, Guide Caster, and Tensioner Pulley
If you want to replace the water pump as part of this job, a 10mm stud removal tool or an "Due east" socket volition make it much easier. This tool or socket volition ease removal of the pump's mounting stud, thereby allowing the pump to clear the camshaft-side timing belt cover. Removing the stud is easier than removing the camshaft sprockets and belt comprehend before removing the pump. Use a wire brush (see video at 13:fifty) to remove any remainder corrosion before installing the new gasket (I use a round brush mounted on a angled drill). Denso h2o pumps come up with a metal gasket with a safe coated inside lip which does not crave any RTV.
If you lot purchased a timing chugalug component kit, your kit should include a new guide pulley or idler pulley (the pulley between the two camshaft sprockets) and a new tensioner caster (between the crankshaft and left camshaft). The guide pulley tin be hands replaced by unbolting the old and bolting on the new. The tensioner pulley is slightly more than difficult. This caster is part of an assembly that allows the caster to dynamically apply continuous pressure on the timing belt (via the tensioner) to take up the slack if the belt stretches. The tensioner mounting commodities runs through a sleeve that allows the caster to movement approximately 30 degrees to take up chugalug slack.
Installing the New Timing Belt: Reassembly
Letters refer to photos at the stop of this department. Click on a photo to enlarge information technology. See also the video at 24:00 and following.
- Start past installing the new chugalug on the right camshaft using the paint line on the new belt (GG). Forestall the belt from slipping off past using a spring loaded plastic alligator clip (HH).
- Stretch the belt and slip the belt onto the left camshaft. Again, use the paint line on the new belt for alignment and use a plastic alligator clip to prevent the belt from slipping off.
- Guide the right side of the belt over the water pump and so position the chugalug on the crankshaft pulley cogs. There should be little to no slack when this is done. Slack may be a sign that the belt is loose by one cog.
- While holding the belt in identify over the crankshaft pulley with the right hand, use the left hand to slip the left side of the belt over the tensioner caster (Ii).
- Bolt on the timing belt tensioner. Applying alternating equal turns on each bolt will gradually compress the tensioner pin against the tensioner pulley assembly. As this occurs, the timing belt volition tighten upward.
- (Optional:) At this point you can start the car to check the belt alignment. If the car misfires, or the "Check Engine" light comes on, turn off the car, connect the crankshaft pulley bolt, and rotate the engine with a ratchet wrench to the alignment marks. Beingness off by one cog will cause an engine misfire. If this happens, the trouble is usually between the right camshaft and the crankshaft.
- Reverse the outlined instructions to reconnect removed components (JJ). The crankshaft pulley bolt can be 'shocked' (torqued) on with a mechanical impact commuter, if either an air or electrically powered bear upon driver is not available (you may be able to rent them at an auto retailer). Alternatively, yous can always bring your machine to a private garage and ask them to torque the commodities on for you. Usually they'll practise it for free out of professional courtesy.
- If the power steering fluid was tuckered, pour in new fluid and turn the steering bike right to left to create suction. The fluid level should drop. Add together more fluid and echo the procedure until the fluid level has stabilized.
Installing the New Timing Belt: Reassembly (GG-JJ)
Fixing an Oil Leak Non From the Timing Chugalug Area
If when yous replace the firewall-side camshaft oil seal you lot notice oil leakage from the valve cover gasket—which is non that uncommon in loftier-mileage cars—you tin can get to my other article on how to supersede the valve comprehend gaskets on a Lexus ES300, which has the same engine and layout every bit your six-cylinder Camry.
This article is accurate and true to the best of the writer's cognition. Content is for advisory or amusement purposes only and does not substitute for personal counsel or professional communication in business, financial, legal, or technical matters.
Questions & Answers
Question: Practise you have similar detailed instructions to remove an axle from a Toyota Camry with a iii.0L 1MZ-Atomic number 26 Engine?
Answer: If you're dealing with the commuter'southward side, you can employ the Toyota Camry 2.2L 5SFE instructions, just I don't have i yet for the rider side.
The commuter's side tutorial is here:
https://axleaddict.com/auto-repair/DIY-Camry-CV-Ax...
Question: I accept Sienna 2006 3.3l, and information technology has a VVT-i engine. I was driving 70 miles/hr and the timing belt broke. What is the risk that the valves are bent?
Answer: Tough question. I'll guess 50/l that they may be okay. What I would do is replace the time belt, kickoff the car upward and run across how information technology runs. Otherwise, yous'll have to do a compression check on each cylinder which in itself is time consuming. After putting on the new chugalug, you can start the machine without having to put everything back on (i.east. crankshaft pulley, covers, motor mounts, belts, etc.)
Question: I have a 2006 sienna 3.iii l, and information technology just didn't get-go one morning. The tensioner/ tensioner pulley failed. I replaced the whole timing kit, just before I put the chugalug on, I safely lined upwardly the camshaft marks and the crankshaft mark without causing damage. Any communication?
Answer: You can try, just the 3.3 3MZ-Fe is an interference engine. While getting the crankshaft to TDC, you have to gradually motility the camshafts aligned with the pistons.
Question: Practise the arrows on timing chugalug point toward the engine or the mechanic?
Answer: The engine.
Question: My dad has a 2002 Toyota Avalon 40 with the 1MZ-Fe engine. I accept already replaced the rear valve cover gasket as I notice oil leaking. Still, afterwards changing the rear valve cover, I still come across some oil sipping down from the corner of the valve embrace right below the timing cover on the rear rider side. Could it be coming from the rear cam seal? Is it possible to remove the #2 timing cover without removing #ane cover and/or the side mounting bracket?
Answer: Yes, more likely it's the rear cam seal. The lower cover mounts over the top comprehend so yous accept to remove the lower before taking off the tiptop. It'southward a timing belt task.
Question: I put a new timing belt on my '95 Toyota Camry LE V6 3.0, and now my engine won't turn over. What should I do now?
Answer: You'll accept to double check all your piece of work.
Question: I accept a 93 Lexus es300 and would similar to know which slot on the camshaft sprockets (pulleys) is used. Does the camshaft use the 3V or 4V slot? Information technology appears that each sprocket can be installed in ii different means.
Answer: You are correct. The same sprocket is used for both the left and right banks. They're mounted in opposition sides to foreclose the belt from slipping off.
Question: I changed the timing belt on a 2002 es300 and the harmonic balancer is up against the lower timing cover. I also cut grooves in the comprehend. I've checked all the piece of work and put a new balancer, simply all the same, I'thou having the aforementioned trouble. I'k tempted to buy some other washer "timing guide #2." Is there any other way to troubleshoot my issues with an es300 engine?
Answer: I see this occasionally with some cars. Believe the plastic cover bellows out over time from heat. I wouldn't worry too much about information technology. It'due south just a dust cover.
Question: When removing the side engine mountain, practice you need to support the engine with a jack from underneath?
Respond: No, information technology is non necessary to support the engine.
DOWNLOAD HERE
How to Tighten Steering Gear on a 1999 Toyota Camry UPDATED
Posted by: jamesaraid1947.blogspot.com

Comments
Post a Comment